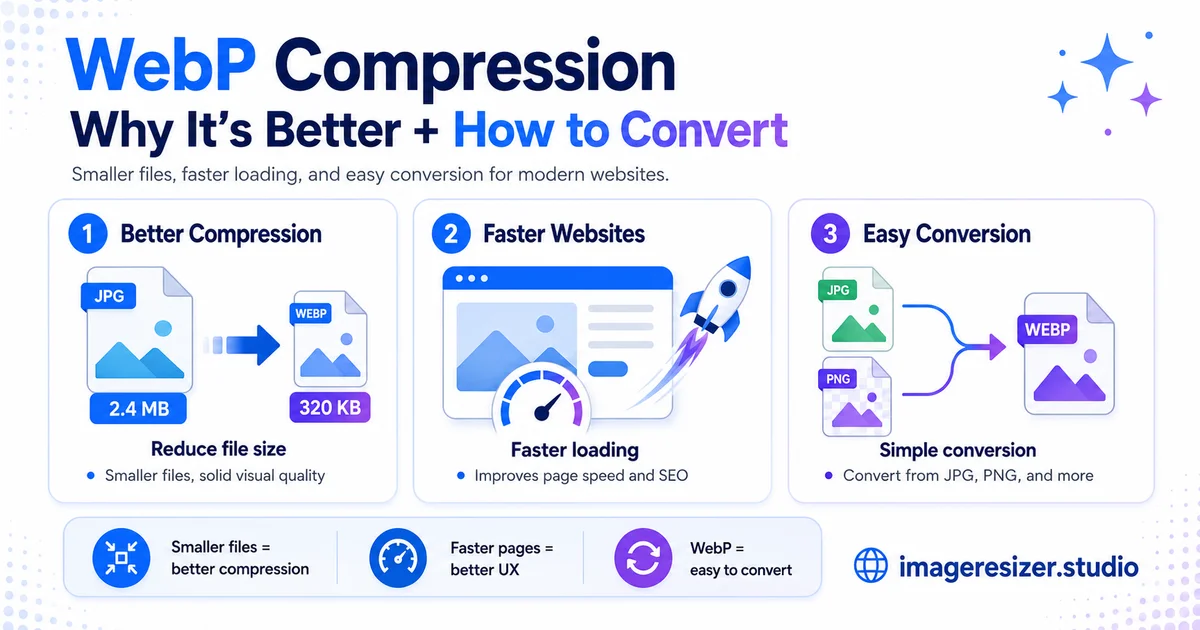
There's an image format that makes your files 25-35% smaller than JPEG, keeps the same visual quality, supports transparency like PNG and even handles animation like GIF. It works in 97% of browsers. And most websites still aren't using it.
That format is WebP. In 2026 there's very little reason to keep serving JPEG and PNG on the web instead. Smaller files, same quality, faster pages, better search rankings. The savings add up fast across a full site.
So why isn't everyone using it? Mostly habit, plus some lingering myths about browser support that stopped being true years ago. WebP is ready, so switching is straightforward.
This guide explains what WebP is, why its compression beats JPEG and PNG, the few places you should still avoid it and exactly how to convert your images to WebP the right way.
What is WebP?
WebP is an image format created by Google in 2010, built on the VP8 video codec and designed specifically for the web. The goal was a single format that could replace JPEG, PNG and GIF all at once, with better compression than any of them.
What makes WebP special is its versatility. Most formats do one job. JPEG is lossy only, good for photos but no transparency. PNG is lossless only, great for graphics but large. GIF handles animation but looks dated. WebP does all of it in one format.
- Lossy compression for photographs, like JPEG but smaller
- Lossless compression for graphics, like PNG but smaller
- Transparency through an 8-bit alpha channel, like PNG
- Animation, like GIF but with far better quality and smaller files
That dual lossy and lossless ability is the heart of it. If you're fuzzy on the difference, this visual guide to lossy vs lossless compression explains what each approach does, and WebP is notable for supporting both in a single file.
Why WebP compression is better
The headline reason is simple: smaller files at the same visual quality. Here's how the numbers break down, based on Google's own large-scale testing.
WebP vs JPEG
WebP lossy images are 25-34% smaller than equivalent JPEGs at the same visual quality. Google tested this on a dataset of a million images. In practice, a product photo that's 200KB as a JPEG might be around 140KB as WebP, with no visible difference. That's 60KB saved on a single image.
Scale that across a site. A page with 10 product images saves around 600KB. A blog with 50 images saves several megabytes. For an online store with thousands of listings, the bandwidth savings are enormous.
WebP vs PNG
WebP lossless images are about 26% smaller than PNG, and lossy WebP can be 30-50% smaller than PNG while keeping transparency. If you've been serving heavy PNGs, WebP is a dramatic upgrade. Here's how to compress PNG images if you want to squeeze your existing PNGs, but converting them to WebP is often the bigger win.
Better quality at low file sizes
WebP doesn't just make smaller files, it also produces fewer ugly artifacts than JPEG at aggressive compression. JPEG's old block-based approach creates visible square patches when pushed hard. WebP's more modern compression keeps images cleaner at the same small size.
WebP vs JPEG vs PNG at a glance
Here's how the three formats stack up on the things that matter for the web.
WebP wins on nearly every web metric. For the complete breakdown including the newer AVIF format, this comparison of JPEG vs PNG vs WebP vs AVIF covers how all four formats compare and when each one wins.
Browser support: the myth is dead
The biggest reason people avoided WebP was browser support. That concern is now obsolete.
As of 2026, WebP is supported by every major browser: Chrome, Firefox, Safari (version 14 and up), Edge and Opera. That's over 97% of global browser usage. The only real holdout is Internet Explorer, which Microsoft has discontinued and whose usage is negligible.
In practice, this means you can serve WebP to almost everyone with confidence. For the tiny remaining fraction, a simple JPEG fallback using the HTML picture element covers them, though for most sites even that is optional now. The compatibility worries that held WebP back belong to the past.
Ready to convert your images to WebP and shrink them? Use the free image compressor → to convert and compress to WebP in one step, or try the custom compressor → to control the exact quality, format and target file size. Both run in your browser with no upload to any server.
When you should not use WebP
WebP is the right default for the web, but it's not right for everything. Here are the genuine exceptions.
Email attachments
Email client support for WebP is poor and inconsistent. Gmail, for example, partially supports it but may convert images to JPEG before delivery, which can break transparency. For email, stick with JPEG for photos and PNG for graphics.
Print and professional publishing
WebP is built for screens, not print. Most print shops, InDesign workflows and professional publishing tools don't accept WebP, while color accuracy can suffer in print contexts. For anything heading to print, use JPEG or a print-ready format.
Editing master files
For images you'll edit repeatedly and archive long term, lossless formats like PNG or TIFF remain the safer choice because they're more universally supported in desktop design software. Convert to WebP when you publish, not while you're still editing.
Sharing with people on older software
If you're sending an image to someone who might open it in older desktop software, JPEG is the universal safe bet. WebP wins on the web, but JPEG still wins on raw compatibility everywhere else.
How to convert your images to WebP
Converting to WebP is quick, but doing it the right way matters for getting the best result.
The browser method (easiest)
- Open an online image compressor or converter in your browser
- Upload your JPEG or PNG images (many tools handle batches)
- Choose WebP as the output format
- Set the quality to around 80-85% for photos, or lossless for graphics
- Download the converted WebP files
The critical rule: convert from the original
Always convert to WebP from your highest-quality original, not from an already-compressed JPEG. Converting a JPEG that's already been compressed at 80% into a WebP at high quality can paradoxically produce a larger file, because you're trying to preserve compression artifacts that are already there. Start from the source for the smallest, cleanest result.
Quality settings that work
- Photos: lossy WebP at 80-85% quality, visually identical to the original
- Logos and graphics with transparency: lossless WebP, or lossy at high quality
- Large hero images: lossy WebP at 80%, prioritizing load speed
One technical note: WebP has a maximum dimension of 16,383 pixels on either side. For normal web images this never matters, but it's worth knowing if you work with very large source files.
Using WebP on your website
Once your images are WebP, serving them well is the final step.
Most modern content systems handle WebP automatically. Many WordPress plugins convert your uploads to WebP and serve them with a JPEG fallback without you doing anything. Image CDNs like Cloudinary and Cloudflare can convert to WebP on the fly, detecting whether each visitor's browser supports it and serving the right format automatically.
If you're converting an existing site, prioritize your above-the-fold and hero images first, since those have the biggest impact on load speed and Core Web Vitals. Then batch-convert the rest of your media library. The performance gain is usually immediate and measurable.
4 mistakes to avoid with WebP
1. Converting from already-compressed files
Converting a compressed JPEG to WebP can increase the file size instead of shrinking it. Always convert from the original, highest-quality source for the best result.
2. Using WebP for email
Email clients handle WebP poorly. Sending a WebP attachment risks broken images or stripped transparency. Use JPEG or PNG for anything going through email.
3. Setting lossy quality too high when converting
Trying to convert a JPEG to WebP at 95% quality can produce a larger file than the source. For photos, 80-85% is the sweet spot. Going higher often wastes space without any visible benefit.
4. Forgetting the fallback for edge cases
While 97% support is excellent, a JPEG fallback via the picture element is still good practice for sites that want full coverage. It's a small safety net for the last sliver of older browsers.
Wrapping up
WebP gives you smaller files than JPEG and PNG, the same or better visual quality, transparency, animation and 97% browser support. For images on the web in 2026, it's the right default, so the old worries about compatibility are gone.
Convert from your original files, use 80-85% quality for photos and lossless for graphics, then keep JPEG and PNG for email, print and editing. Prioritize your hero images first, then convert the rest. The result is a faster site that ranks better and costs less in bandwidth.
There's no good reason to serve JPEG over WebP on the web anymore. The format is ready, the tools are simple and the savings are real.