Your passport application is open in another tab. You took a photo on your phone. The upload field rejected it 3 times. The error message keeps changing. "File too large." "Wrong dimensions." "Image not accepted."
Passport photo uploads are the most quietly stressful part of any government application. The rules are oddly specific, every country has its own version and the upload forms are unforgiving.
The good news: once you know your country's requirements, resizing a passport photo takes about 60 seconds. The frustration comes from guessing instead of knowing.
This guide gives you exact specifications for 15+ countries, the universal rules that apply almost everywhere and the workflow to resize any photo into a valid passport image without paying a photography studio.
Why every country has different passport photo rules
Passports follow an international guideline called ICAO 9303 (set by the International Civil Aviation Organization). It defines the basic photo requirements that work for biometric checks at airports.
But each country layers its own rules on top. Some want 35x45mm. Others want 2x2 inches. Some demand a white background. Others accept off-white. The face has to occupy a specific percentage of the frame, eyes need to be at a specific height and the file size has to fit a specific KB range.
These rules exist because passport photos feed into facial recognition systems. If your face is too small in the frame, the system can't match you reliably. If the background isn't pure enough, the algorithm gets confused. If the file is too big, government servers reject it before it ever reaches a human.
Match the rules exactly and your application goes through. Get any of them wrong and you're starting over.
Anatomy of a valid passport photo (universal rules)
Most countries agree on these basics. Get these right and you've solved 80% of the problem before you even check country-specific rules.
Most rejections happen because of background problems, accidental smiles or the face being too small in the frame. Fix those three and your photo will pass in almost every country.
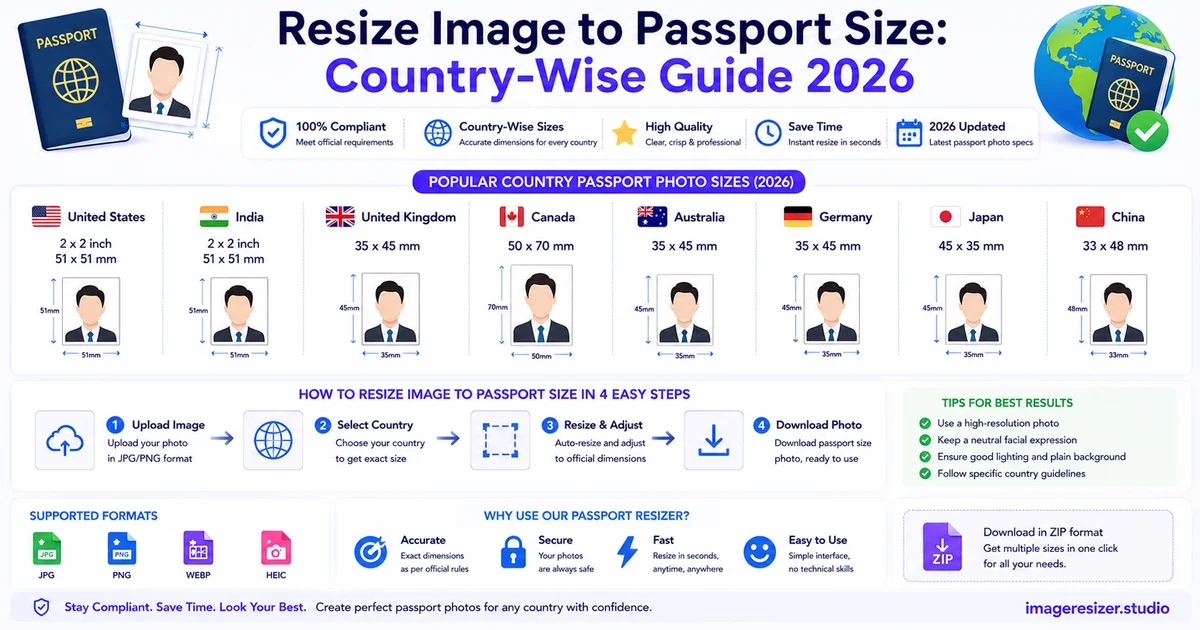
Passport photo size requirements by country (2026)
Use this as your reference. Dimensions, file size limits and any country-specific quirks for each.
United States
- Print size: 2x2 inches (51x51 mm)
- Pixel dimensions: 600x600 pixels minimum (1200x1200 recommended)
- Resolution: 300 DPI
- File format: JPEG
- File size: 240 KB maximum for online uploads
- Background: pure white
- Head height: 1 to 1.375 inches from chin to top of head
United Kingdom
- Print size: 45x35 mm
- Pixel dimensions: 600x750 pixels for online applications
- File format: JPEG
- File size: 50 KB to 10 MB for online uploads
- Background: plain light grey or cream (NOT pure white)
- Head height: 29-34 mm from chin to crown
India
- Print size: 35x45 mm (3.5x4.5 cm)
- Pixel dimensions: 350x450 pixels minimum
- File format: JPEG
- File size: 10 KB to 1 MB for online uploads (Passport Seva)
- Background: plain white
- Head height: 25-35 mm, face covering 70-80% of the frame
Canada
- Print size: 50x70 mm
- Pixel dimensions: 420x540 pixels minimum
- File format: JPEG
- File size: typically under 240 KB
- Background: plain white or light coloured
- Head height: 31-36 mm from chin to crown
Australia
- Print size: 35-40 mm wide x 45-50 mm tall
- Pixel dimensions: 900x1200 pixels recommended
- File format: JPEG
- File size: under 2 MB
- Background: plain light grey or white
- Head height: 32-36 mm from chin to crown
Schengen / European Union
- Print size: 35x45 mm (standard EU passport size)
- Pixel dimensions: 413x531 pixels at 300 DPI
- File format: JPEG
- File size: varies by country, typically 100 KB to 500 KB
- Background: light grey or white (depends on country)
- Head height: 32-36 mm
Germany
- Print size: 35x45 mm
- Pixel dimensions: 413x531 pixels
- Background: plain light grey
- Special note: biometric photo mandatory, face must be perfectly straight
France
- Print size: 35x45 mm
- Background: light grey or pale blue (NOT white)
- Special note: very strict on neutral expression and no smiling
Japan
- Print size: 35x45 mm
- Pixel dimensions: 600x800 pixels
- File size: 20 KB to 7 MB
- Background: pure white or light grey
- Head height: 32-36 mm
China
- Print size: 33x48 mm
- Pixel dimensions: 354x472 pixels at 300 DPI
- File size: 40 KB to 120 KB
- Background: pure white
- Special note: ears must be visible
United Arab Emirates
- Print size: 43x55 mm
- Pixel dimensions: 500x650 pixels minimum
- File size: under 250 KB
- Background: white
Singapore
- Print size: 35x45 mm
- Pixel dimensions: 400x514 pixels
- File size: under 60 KB
- Background: pure white
South Africa
- Print size: 35x45 mm
- Pixel dimensions: 413x531 pixels
- File size: under 350 KB
- Background: plain white
Brazil
- Print size: 50x70 mm
- Pixel dimensions: 413x531 pixels
- File size: under 250 KB
- Background: white
Mexico
- Print size: 35x45 mm or 2.5x3 cm
- Background: white
- Special note: requires both front and profile views for some applications
Always cross-check on your country's official passport agency website before submitting. Specifications get updated occasionally and unofficial sources lag behind.
Print size vs pixel size: don't confuse the two
This is where most people get tripped up. A passport photo has two dimensions to worry about.
Print size
The physical dimensions when printed on paper. Measured in millimeters or inches. For US passports it's 2x2 inches. For most other countries it's 35x45 mm.
This matters when you're getting the photo printed at a kiosk or photo studio for a paper application.
Pixel size
The digital dimensions when uploaded online. Measured in pixels. India wants 350x450 pixels. US wants 600x600 pixels minimum. UK wants 600x750.
This matters for online passport applications where you upload a digital file directly.
How they connect
Pixel size = print size x DPI (dots per inch). Most passport authorities specify 300 DPI for print-quality output.
Example: 35x45 mm at 300 DPI = (35/25.4 * 300) x (45/25.4 * 300) = 413 x 531 pixels.
If your photo authority gives you only one measurement (just pixels OR just mm), assume 300 DPI and calculate the other one if needed.
Visual: how pixel size and print size relate
Same photo, two ways of describing it. Always know which one your application form expects.
How to resize a photo into a valid passport image
The full workflow from "selfie on phone" to "submitted passport photo" in under 5 minutes.
Step 1: Take the right kind of photo first
If you skip this and start with a bad source photo, no amount of resizing will save it. Stand 2 feet from a plain white wall. Face the camera directly. Soft, even light from the front. No flash, no shadows behind your head. Neutral expression. Eyes open.
Phone selfies work fine if the lighting is good and the background is plain. Get a friend to take it for you so you can stand naturally instead of holding the phone.
Step 2: Crop tight
Your head should fill 70-80% of the frame from chin to top of head. Most original phone photos have way too much space around the head. Crop in close before you resize.
Use the rule of thirds: eyes should sit roughly at the upper third line of the cropped frame.
Step 3: Resize to your country's pixel dimensions
Look up the exact pixel requirement for your country (use the reference list above). Resize the cropped photo to those exact dimensions. Lock the aspect ratio so the photo doesn't get stretched.
If you're not familiar with how online resizers handle this, here's the foundations guide to resizing images online that walks through the basic process before you tackle passport-specific sizing.
Step 4: Match the file size limit
This is where most passport applications reject photos silently. If your country says "under 240 KB" and your photo is 380 KB, the form will refuse to upload it. Or worse, it'll upload but the system will reject it later.
Use a resizer that lets you target a specific file size in KB. Set it to just under the country's maximum (so if the limit is 250 KB, target 230 KB to leave a buffer).
Step 5: Export as JPEG at 85% quality
Passport authorities universally accept JPEG. PNG is sometimes accepted but the file sizes are 3-5x bigger which makes hitting the KB limit harder.
Set JPEG quality to 85-90%. Below 80% the face starts looking soft, which can fail the biometric check. Above 90% you'll struggle to fit under the file size limit.
Step 6: Verify before uploading
Open the final file. Check three things: dimensions are exactly what the form wants, file size is under the limit and the photo still looks like you at full resolution. If all three pass, upload.
Want to skip the manual setup and resize your passport photo to exact specifications? Use the free image resizer here →. Enter your country's exact pixel size and file size limit, drop your photo in and download a passport-ready image in 30 seconds.
Why passport photos get rejected (and how to avoid it)
Passport rejections are quietly common. Around 1 in 4 photos submitted for US passports get sent back for re-work. The reasons are surprisingly consistent.
1. Background problems
Shadow behind your head from harsh lighting. Background that's slightly grey instead of white. Wall texture visible. Other objects in frame.
Fix: stand at least 2 feet from a plain wall. Use natural daylight from the side, not behind you. Edit out any shadows in post-processing if needed.
2. Smiling or unusual expression
Even a slight smile can trigger rejection because biometric systems compare your face to the photo. A smiling photo doesn't match your neutral face at the airport.
Fix: keep your mouth closed. Look directly at the camera. Relaxed but not happy.
3. Glasses, hair, or accessories blocking the face
Glasses cause glare and shadow. Hair covering the eyebrows or eyes is an automatic reject. Hats are banned in most countries (religious head coverings excepted).
Fix: remove glasses. Tuck hair behind ears. Take off any accessories. Religious head coverings are allowed but your face must be fully visible from the chin to the forehead.
4. Wrong dimensions or file size
The form rejects the upload silently or the file gets accepted but the application is flagged later.
Fix: use a resizer that lets you set exact pixel dimensions and file size in KB. Match the country specification exactly.
5. Photo is too old
Most countries require the photo to be taken within the last 6 months. Some say 12 months. If you've changed your appearance significantly (haircut, beard, weight change), take a new photo even if the old one is recent.
Handling passport photos for the whole family
If you're processing passport photos for multiple family members at once (renewal time for everyone, or applying as a family), it's worth doing them in a batch instead of one at a time.
Each person needs their own photo session, but the resizing rules are identical. Here's the bulk image resizing guide that walks through processing multiple photos with the same settings, which works perfectly for family passport applications.
Tip: shoot all the family photos in the same session against the same wall with the same lighting. The processing will be consistent and you won't have to re-configure settings between photos.
Beyond passports: where the same skills apply
Once you've learned how to resize and compress a photo to government specifications, you can handle almost any official document upload.
The same skills work for:
- Driver's license applications
- Visa applications (which often have stricter requirements than passports)
- Government ID cards
- University admission forms
- Job application portals with photo uploads
- LinkedIn profile photos (which need similar professional framing)
The professional headshot rules are similar, but for social media and work platforms there are different size requirements. Here's the social media image sizing guide if you also need to prepare a photo for LinkedIn or other professional platforms.
Frequently Asked Questions
Can I take a passport photo with my phone?
Yes, in most countries. The photo just needs to meet the size, background and expression rules. Phone cameras are sharp enough for passport biometric checks. The harder part is getting the lighting and background right, not the camera itself.
Why does my passport photo upload keep failing?
Usually one of three things. Either the dimensions don't match the form's required pixel size, the file size is over the KB limit or the format isn't JPEG. Check your country's exact requirements (use the reference list above) and resize your photo to match all three precisely.
How do I reduce my passport photo to under 50 KB without losing quality?
Use a resizer that lets you target a specific file size. Don't try to do it manually with quality sliders because you'll spend hours guessing. Set your target to 45 KB (slightly under the limit), let the tool reduce dimensions and compression together until it hits the size.
Do passport photos need to be in color or black and white?
Color, in every country that issues biometric passports (which is essentially all of them now). Black and white photos haven't been accepted for new passports since the early 2000s.
What if my country's requirements aren't in your list?
Check your country's official passport agency website. Search for "[country name] passport photo specifications" and find the government domain (usually .gov or the local equivalent). Specifications get updated and unofficial sources lag behind. The official source is always the safest.
Wrapping up
Passport photo requirements look complicated until you realize they're just three numbers: pixel dimensions, file size in KB and a format (almost always JPEG). Get those three right and the upload form stops fighting you.
Take a clean photo against a plain background. Crop tight so your head fills 70-80% of the frame. Resize to your country's exact pixel specification. Compress to fit under the file size limit. Save as JPEG at 85% quality. Upload.
Five minutes of work to avoid a rejection that costs you a week.