You spent 20 minutes shooting the perfect photo. Edited it. Posted it to Instagram. The platform cropped your subject's head off.
Then you tried Facebook. The image looked stretched. LinkedIn squeezed it into a weird strip. Twitter (or X, whatever it's called this week) showed a pixelated mess in the preview.
This isn't bad luck. Every social platform has its own dimensions and you fed them all the same photo. They each cropped it to fit. The results were never going to look the same.
A social media image resizer fixes this in about 30 seconds. You upload once, pick the platform you're posting to and download an image that fits perfectly without losing sharpness or cropping anything important.
This guide breaks down what social media image sizing actually requires, the dimensions you need for every major platform in 2026, the resizing mistakes that quietly kill your engagement and the exact workflow to get every image looking right.
Why social media image size matters more than you think
Upload the wrong size and one of three things happens. The platform crops the image (and almost never crops it the way you'd want). It stretches the image to fit (which looks bad and slightly distorted). Or it compresses the image hard to make it fit (which kills detail and makes text fuzzy).
None of those are good outcomes when your goal is for people to stop scrolling and look.
There's also an engagement piece. Properly sized images load faster, look sharper on retina screens and don't get truncated in feed previews. Platforms quietly favor content that displays well because it keeps users on the platform longer. Right-sized image = better display = slightly better reach.
And then there's the professional angle. A blurry, badly cropped image on your LinkedIn or business Instagram makes you look careless. People notice.
The fundamentals: aspect ratio, pixels and file size
Three things decide whether your image fits a platform properly.
Aspect ratio
The shape of the image. 1:1 is a perfect square. 4:5 is portrait. 16:9 is widescreen. 9:16 is vertical (think Reels and Stories). If your aspect ratio doesn't match the platform's preferred ratio, the platform will crop or pad your image.
Pixel dimensions
The actual width and height of the image. 1080x1080 is a square Instagram post. 1200x630 is a Facebook link preview. 1500x500 is a Twitter/X header. Match these exactly and your image displays at full quality.
File size
How many KB or MB the file takes up. Platforms have upload limits (usually 5 to 30 MB per image) and they re-compress anything bigger. Stay under the limit and they'll usually keep your image close to the quality you uploaded.
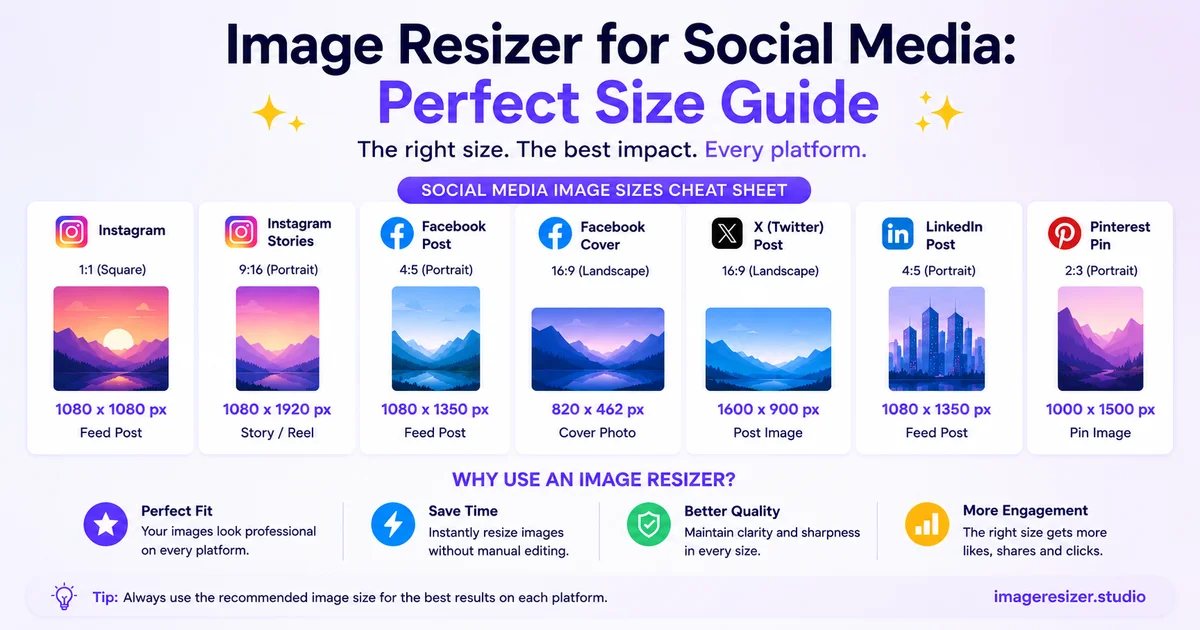
Complete social media image sizes (2026)
Reference table for every platform that matters. Bookmark this section.
- Square post: 1080x1080 pixels (1:1 ratio)
- Portrait post: 1080x1350 pixels (4:5 ratio). This is the largest size Instagram allows in the feed and it takes up the most screen space
- Landscape post: 1080x566 pixels (1.91:1 ratio)
- Story / Reel: 1080x1920 pixels (9:16 ratio)
- Profile photo: 320x320 pixels minimum
- Carousel: 1080x1080 or 1080x1350 for each slide
- File size limit: 30 MB per image
- Feed post (landscape): 1200x630 pixels
- Feed post (square): 1080x1080 pixels
- Cover photo: 851x315 pixels (desktop), but use 1640x624 to look sharp on retina screens
- Profile photo: 360x360 pixels minimum
- Event cover: 1920x1005 pixels
- Story: 1080x1920 pixels
- Shared link preview: 1200x630 pixels
- File size limit: varies, 4 MB is safe for fast loading
- Feed post (landscape): 1200x627 pixels
- Feed post (square): 1080x1080 pixels
- Cover photo (personal): 1584x396 pixels
- Cover photo (company page): 1128x191 pixels
- Profile photo: 400x400 pixels minimum
- Article cover: 1200x644 pixels
- File size limit: 8 MB per image
Twitter / X
- Single image post: 1600x900 pixels (16:9) or 1200x675
- Header photo: 1500x500 pixels
- Profile photo: 400x400 pixels
- Multi-image post (2 images): each at 1080x1080
- Link preview card: 1200x628 pixels
- File size limit: 5 MB per image (15 MB for animated GIFs)
TikTok
- Profile photo: 200x200 pixels minimum
- Video / image slideshow: 1080x1920 pixels (9:16 ratio)
- In-feed ad image: 1080x1920 pixels
- File size limit: 287 MB for video, much smaller for static images
YouTube
- Thumbnail: 1280x720 pixels (16:9)
- Channel banner: 2560x1440 pixels
- Profile photo: 800x800 pixels
- Video end screen image: 1280x720 pixels
- File size limit: 2 MB for thumbnails, 6 MB for banner
- Standard pin: 1000x1500 pixels (2:3 ratio). This is the sweet spot
- Square pin: 1000x1000 pixels
- Long pin: 1000x2100 pixels (gets cut off in feed but works for some use cases)
- Story pin / Idea pin: 1080x1920 pixels
- Board cover: 600x600 pixels
- Profile photo: 165x165 pixels minimum
- File size limit: 32 MB
Threads
- Image post: 1080x1350 pixels (matches Instagram's portrait standard)
- Profile photo: pulled from Instagram, 320x320 minimum
- File size limit: 8 MB
Pick your platform-specific game plan
Different goals need different sizing strategies. Here's how to think about it.
Posting the same image to multiple platforms
Don't upload one master file and hope for the best. Create platform-specific versions. A landscape photo at 1200x630 for Facebook becomes a 1080x1350 portrait crop for Instagram so it takes up more screen space.
The fastest way to do this: open your original image once and export it to each platform's size in a single session. A good social media image resizer lets you batch this so you're not doing each one manually.
Running ads
Ad images have stricter rules than organic posts. Facebook ads recommend 1200x628. Instagram ads work best at 1080x1080 or 1080x1350. If you're running across both, prep both sizes upfront because the ad managers won't let you re-crop after the campaign starts.
Building a consistent grid (Instagram, Pinterest)
Pick one aspect ratio and stick to it. A grid where every third post is landscape and the rest are portrait looks chaotic. Decide whether your brand is 1:1 (clean, classic Instagram), 4:5 (modern, takes more feed space) or 2:3 (Pinterest style) and resize every image to that ratio.
Stories and Reels-first content
Shoot and resize for 1080x1920 (9:16) first. You can always re-crop a vertical image into a square later, but going the other way (square to vertical) leaves you with awkward gaps that have to be filled with text or background colors.
Stop guessing at dimensions for every post. Use the free image resizer with built-in social media presets →. Pick your platform, drop your photo in and download a perfectly sized version in seconds.
The 6-step workflow to resize any image for social media
This is the process that takes you from "I have a photo" to "perfectly sized for the platform" in under a minute.
Step 1: Start from your highest quality version
If the photo is on your phone, send it to yourself uncompressed. iPhone users: AirDrop, or upload from "Files" instead of "Photos" to skip the iOS compression. Android: pull the original from your gallery folder, not a chat thread.
The biggest mistake people make is resizing a photo that's already been compressed by WhatsApp or Instagram. That image lost quality the moment it touched those apps. Always start from the source.
Step 2: Decide your destination first
Before you resize anything, know exactly where the image is going. "Instagram square post" is a specific destination. "Social media" is not. The dimensions you pick are useless without a platform in mind.
Step 3: Pick the right resizing tool
Browser-based resizers are the fastest for one-off social media work. No software install, no signup and they run locally so your photos don't get uploaded to anyone's server.
If you're new to this, here's a beginner's guide to resizing images online that walks through the basics before you tackle platform-specific sizing.
Step 4: Choose dimensions vs file size
For social media you almost always want to resize by dimensions, not file size. The platform cares about pixel dimensions for display. File size only matters if you're hitting an upload limit, which is rare for a single photo.
Enter the exact pixels (like 1080x1080 for Instagram square) and let the tool figure out the file size.
Step 5: Lock the aspect ratio (or crop intentionally)
If your photo is 4:3 and you're forcing it into a 1:1 square, you have two choices. Crop the image (lose some content but keep proportions) or pad the image with white/colored bars (keep everything but lose visual impact).
For Instagram and most social platforms, cropping looks more professional. For Pinterest where every pin is portrait, sometimes padding makes sense if your image just won't crop well.
Step 6: Export in the right format
JPEG for photos. PNG for graphics, logos, or anything with sharp text. Most platforms accept both but they re-encode JPEGs more aggressively than PNGs, so use PNG when image clarity matters (like quote graphics or screenshots).
Set JPEG quality to 85-90%. Above 90% the file gets unnecessarily large with no visible improvement. Below 80% the platform's own compression on top of yours makes the image look washed out.
5 mistakes that ruin social media images
1. Uploading the same file to every platform
Instagram crops differently from Facebook. Facebook crops differently from LinkedIn. One master file means every platform displays a compromised version. Take the time to make platform-specific versions.
2. Ignoring the safe zone for important content
Each platform has a "safe zone" where text and faces won't get cropped in any preview. Keep your subject's face and any text inside the center 80% of the image. The outer edges are fair game for platform cropping.
3. Resizing images that were already resized
Every resize on a JPEG adds compression artifacts. If you've already resized a photo for Instagram and now want it for LinkedIn, go back to the original. Don't resize the resize.
4. Using huge dimensions "just to be safe"
Uploading a 4000x4000 image for Instagram doesn't get you a sharper image. Instagram resizes it down to 1080x1080 anyway and their compression is harsher on oversized uploads. Match the platform's recommended size exactly.
5. Forgetting about retina screens
Half of social media browsing happens on phones with high-pixel-density displays. An image that looks fine at 800x800 on a desktop monitor looks slightly soft on a retina iPhone. When in doubt, use the platform's recommended size (which already accounts for retina) and don't go below.
Frequently Asked Questions
What's the best image size for posting on multiple social platforms at once?
1080x1080 is the safest universal size. It works as an Instagram square, a Facebook square post, a LinkedIn square post and a Twitter/X feed image. You lose some screen real estate on platforms that prefer portrait, but it's the closest thing to a one-size-fits-all dimension.
Will resizing my photo for social media make it blurry?
Not if you do it right. Resizing down (taking a 4000x4000 photo to 1080x1080) keeps the image sharp because you're throwing away pixels you don't need. The blur happens when you resize up (going from small to large) or when you use a low-quality tool that over-compresses on save.
Why does my image look different on Instagram than it did on my phone?
Two reasons. First, Instagram re-compresses every upload to save bandwidth. Second, if your image wasn't already sized for Instagram, the platform cropped or scaled it to fit, which can shift composition. Resizing to 1080x1080 (or 1080x1350 for portrait) before upload solves both.
Do I need a separate tool for each social platform?
No. One good social media image resizer with built-in presets handles every platform. You pick "Instagram square" or "LinkedIn cover" from a dropdown and the tool applies the right dimensions automatically.
Can I resize images for Stories and Reels separately from feed posts?
Yes and you should. Feed posts use 1:1 or 4:5 ratios. Stories and Reels use 9:16. Resizing a horizontal photo to 9:16 forces a crop that often kills the composition. Either shoot vertically from the start or pick a horizontal image where a tight center crop still works.
Wrapping up
Social media platforms aren't going to standardize their dimensions. Instagram wants 1080x1080. LinkedIn wants 1200x627. TikTok wants 1080x1920. They've each picked the size that fits their feed and they're not changing it.
Your job is to give each platform what it wants. Resize your original photo to the right pixel dimensions, export at the right quality, upload and let the platform do the rest. Do it once per platform and you're set.
It takes longer to read this guide than to actually resize an image once you have the right tool open.